Introduction
The ubiquitous LAMP (Linux / Apache / MySQL / PHP) Stack has scores of guides
available across the Internet. Searching LAMP Stack $linuxdistro will return
thousands of results; many of which are reliably up-to-date and accurate.
Attempting the same with OpenBSD, however, is not as fruitful; current,
correct, and comprehensive guides are not as plentiful. To start, there is no
comparable search pattern; for example, OAMP Stack (OpenBSD / Apache / MySQL
/ PHP) returns 23 results. Most of these are not relevant, and less than
a handful are current. Further, the base system web server is named httpd,
which presents more of a challenge in searching for quality content. There is,
however, a silver lining for OpenBSD users: quality documentation and rock
solid design. The official OpenBSD documentation is clear and
concise, super easy to follow, and invariably correct. Certainly much more
reliable than that of its better known cousin, FreeBSD. Further,
packages installed with pkg_add often provide additional system specific
information in /usr/local/share/doc/pkg-readmes with step-by-step
instructions to produce a sane configuration out of the box. OpenBSD developers
put in a lot of work to ensure users are met with precise documentation. It is
an example of quality trumping quantity and engineering brilliance!
With that in mind, this guide–which assumes an OpenBSD 6.2 install–presents information sourced from the official OpenBSD documentation, provided in the FAQ, as well as official third-party software documentation. These sources with ad hoc use of relevant man pages are more often than not all that is needed for a successful installation.
HTTP Daemon Setup
OpenBSD comes with its own web server: httpd. It is secure, lightweight and
very simple to use.
rcctl is used to configure and control daemons, and should be used to enable
and start httpd.
# rcctl enable httpd
# rcctl start httpd
The enable command adds an entry to /etc/rc.conf.local, which is where
all the scripts that control the system daemons and services are set and
configured to run during system startup.
OpenBSD provides an example configuration file in /etc/examples/httpd.conf
that you can peruse if not use for your setup. Creating your own is quite
simple, however, and can be done in as little as a half dozen non-whitespace
lines.
Create a new /etc/httpd.conf file with the following contents (replacing
domain.tld with your site particulars):
types {  include "/usr/share/misc/mime.types" }

server "domain.tld" {
     alias "www.domain.tld"
     listen on * port http
     root "/htdocs/site_name"
     directory index index.php

     location "/*.php*" { fastcgi socket "/run/php-fpm.sock" }

     location "/.well-known/acme-challenge/*" {
	     root "/acme"
	     root strip 2
     }
}
The meaning of each line can be learned from the httpd.conf(5) man
page. In short, the above will serve regular HTTP (i.e., port 80) domain.tld
and www.domain.tld requests from /var/www/htdocs/site_name, and process all
PHP requests through a Unix socket connection to the FastCGI Process Manager.
The second location directive handles acme challenges that are received
when generating a HTTPS certificate with
acme-client(1)–described in detail in this
post–and should be done after standing up this WordPress site.
Before moving onto MariaDB installation, copy some files needed for name
resolution into the chroot, then check the syntax of the configuration file
before loading httpd.conf:
# mkdir /var/www/etc && cp /etc/{resolv.conf,hosts} /var/www/etc/
# httpd -vnf /etc/httpd.conf
configuration OK
# httpd -f /etc/httpd.conf
That concludes the rather simple setup of httpd.
Database Installation
OpenBSD offers both PostgreSQL and MariaDB, the open source MySQL fork. PostgreSQL is an excellent (and likely superior) alternative to MySQL, but its configuration is not as widely covered in the official documentation of many third-party applications. Plus, for most personal and SOHO environments it is arguably overkill, with any real advantage often wasted. In contrast, MySQL/MariaDB installations share common syntax with most third-party documentation. In short, MySQL/MariaDB is simpler and more than suitable for this use case. It can be installed with:
# pkg_add mariadb-server
Once downloaded, use the install script provided before enabling and starting the daemon:
# mysql_install_db
# rcctl enable mysqld
# rcctl start mysqld
MariaDB provides a post-install script to secure the daemon and create a root superuser account, which should be run with:
# mysql_secure_installation
A series of easily answered questions will follow; set the root password and answer yes to each question.
Once finished, before accessing the database, change the environment to delete MySQL input rather than have it logged in clear text by adding the following to
/etc/rc.conf.local:
export MYSQL_HISTFILE=/dev/null
Access MariaDB as the superuser to create a database for the upcoming WordPress
installation; when prompted, input the root password then enter the following
SQL statements to create the wordpress database owned by wp-admin
authenticated with password:
# mysql -u root -p
Enter password:
Welcome to the MariaDB monitor.  Commands end with ; or \g.
Your MariaDB connection id is 1
Server version: 10.4.12-MariaDB OpenBSD port: mariadb-server-10.4.12v1

Copyright (c) 2000, 2018, Oracle, MariaDB Corporation Ab and others.

Type 'help;' or '\h' for help. Type '\c' to clear the current input statement.

MariaDB [(none)]> CREATE DATABASE wordpress;
Query OK, 1 row affected (0.01 sec)

MariaDB [(none)]> GRANT ALL ON wordpress.* to 'wp-admin'@'localhost' IDENTIFIED BY 'password';
Query OK, 1 row affected (0.00 sec)

MariaDB [(none)]> FLUSH PRIVILEGES;
Query OK, 1 row affected (0.00 sec)

MariaDB [(none)]> quit
Bye
To ensure MariaDB can communicate with httpd through a unix socket, create
its directory within the chroot:
install -d -m 0711 -o _mysql -g _mysql /var/www/var/run/mysql
Then edit /etc/my.cnf and change the socket location under both the client
and mysqld sections to the absolute path of the socket file located inside
the chroot:
[client]
socket = /var/www/var/run/mysql/mysql.sock
[mysqld]
socket = /var/www/var/run/mysql/mysql.sock
Note: Newer versions of MariaDB might instead have only one
[client-server]section to place thesocketdirective.
Restart the daemon to make these changes take effect before moving onto the PHP installation:
# rcctl restart mysqld
PHP Configuration
Like many pkg_add installed applications, PHP is offered as a pre-compiled
binary in one configuration. Any extensions not included in the default
provision can be installed as additional packages, which will now be done with
pkg_add. At the interactive prompt, select version +5.6.31+7.4.7
(i.e., option 3).
# pkg_add php php-mysqli php-curl php-zip php-gd
quirks-3.325 signed on 2020-06-12T06:24:53Z
Ambiguous: choose package for php
  0: <None>
  1: php-7.2.31
  2: php-7.3.19
  3: php-7.4.7
Your choice: 3
With the web server previously configured to handle PHP requests, we can move
straight onto PHP configuration. Start with enabling all the extensions just
installed by symlinking the provided .ini files into the extension directory.
# cd /etc/php-7.4
# ln -s ../php-7.4.sample/*.ini .
Some minor adjustments to the default PHP configuration will be made to
optimise runtime performance. Open /etc/php-fpm.conf and search for the
string pm = to make the following changes:
pm = ondemand
pm.max_children = 50
pm.max_requests = 500
Next, activate Zend OpCache by either uncommenting and editing, or appending,
the following entries to /etc/php-7.4.ini to enable caching compiled PHP
files, which will increase the speed at which requests are served:
[opcache]
opcache.enable=1
opcache.enable_cli=1
opcache.interned_strings_buffer=8
opcache.max_accelerated_files=10000
opcache.memory_consumption=128
opcache.save_comments=1
opcache.revalidate_freq=1
Now enable and start php-fpm, and restart httpd:
# rcctl enable php74_fpm
# rcctl start php74_fpm
# rcctl restart httpd
Testing
At this point, httpd is up and serving out of /var/www/htdocs/site_name,
handling PHP requests with FastCGI Process Manager, and communicating with the
MariaDB backend managing the WordPress database through a unix socket. To test
this setup, create the file /var/www/htdocs/site_name/info.php with the
following contents:
<?
  phpinfo();
?>
Now open domain.tld/info.php in your browser, and you should be greeted with the easily recognisable PHP info page.
If working as expected, delete info.php and move onto WordPress installation.
Web Deployment
Download the latest WordPress tarball into
/var/www/htdocs/site_name, extract its contents, change the WordPress
installation group ID to the www user, and copy the sample configuration file
into place.
# cd /var/www/htdocs/site_name
# ftp -S do https://wordpress.org/latest.tar.gz
# tar -zxvf latest.tar.gz
# rm latest.tar.gz
# chown -R :www wordpress
# cp wordpress/wp-config-sample.php wordpress/wp-config.php
Open wordpress/wp-config.php and define related database variables with the
previously created database details:
define('DB_NAME', 'wordpress');
define('DB_USER', 'wp-admin');
define('DB_PASSWORD', 'password');
define('DB_HOST', 'localhost');
Now open /etc/httpd.conf to change the root of domain.tld to the relative
path of the /wordpress directory inside the chroot so that domain.tld
requests are served from the WordPress installation:
root "/htdocs/site_name/wordpress"
Reload the configuration for changes to take effect:
# rcctl reload httpd
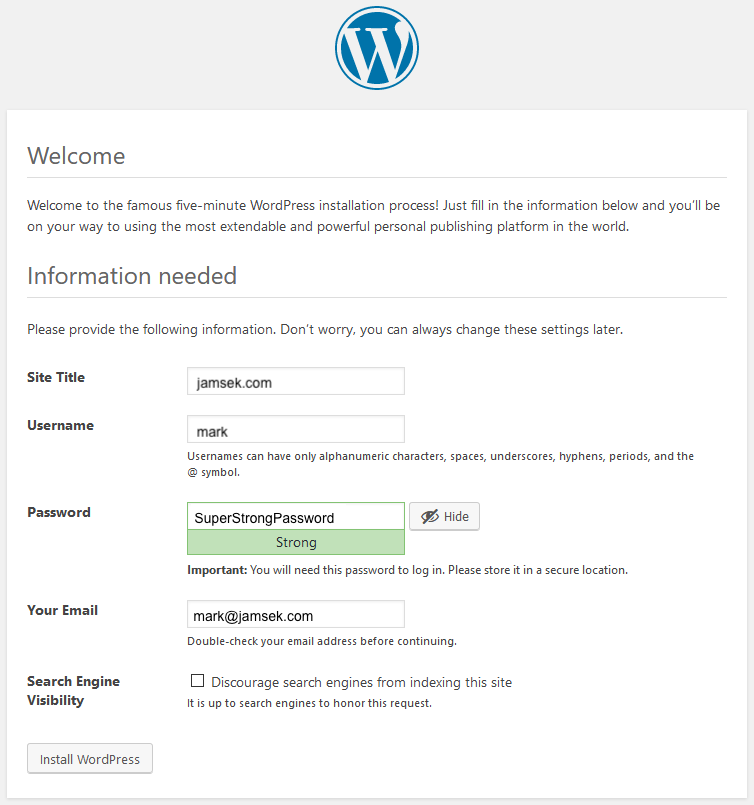
Open domain.tld in a browser, where the new WordPress installation will prompt to enter site details and create an admin user.
Further Reading
History
2020-06-15 Updated to reflect the installation process on OpenBSD 6.7.